
How to Make Traditional Arancini (AKA Italy’s Crispy Rice Balls of Joy)
Let’s be real for a second: Arancini are proof that Italians looked at leftover risotto and said, “Yeah, let’s make this extra.” And thank goodness they did, because these golden, crunchy, cheesy rice bombs are basically snack royalty.
If you’ve never had arancini before (first of all, I’m so sorry), imagine this: warm, creamy risotto wrapped around melty cheese (and sometimes meat or peas), rolled into a ball, coated in breadcrumbs, and deep-fried until golden and crispy. Yes, it’s as good as it sounds.
Spoiler: You don’t have to use leftover risotto. You can totally make it fresh with the sole intention of turning it into crispy spheres of happiness. No judgment here.
What Makes Arancini So Addictive?

- Crispy outside, creamy inside. Texture contrast = perfection.
- Melty cheese surprise. Like a savory Kinder egg, but Italian and 1000x better.
- Customizable AF. You can stuff them with whatever you’re feeling.
- Portable. It’s a snack! It’s a meal! It’s a lunchbox hero!
These things are the MVP of Italian street food. Bite-sized, handheld, and 100% satisfying.
Ingredients You’ll Need (AKA What’s in the Ball)
For about 12 arancini (or fewer if you go big):
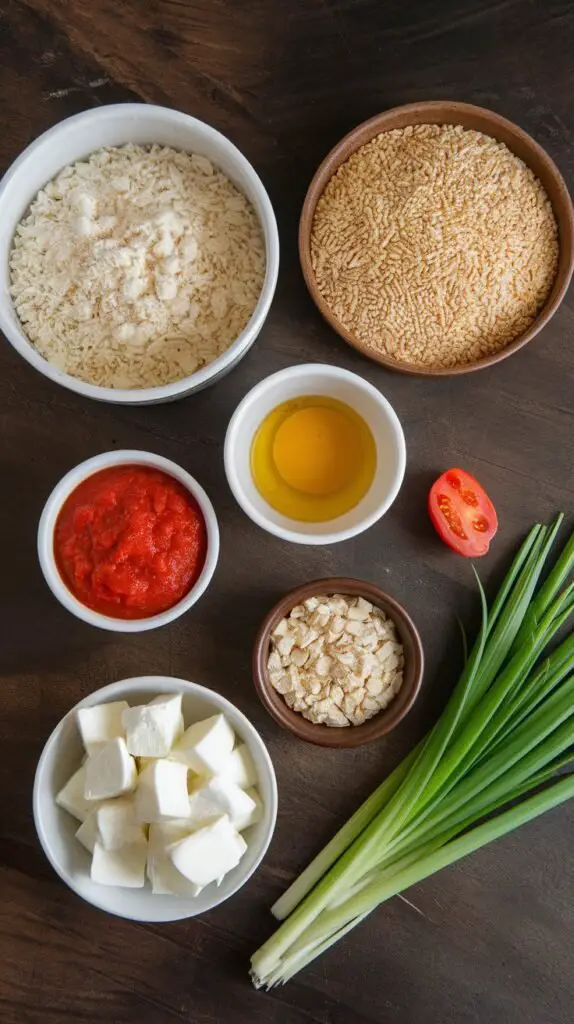
For the risotto base (or use leftovers!):
- 1 ½ cups Arborio rice
- 4 cups chicken or vegetable broth (warmed)
- 1 small onion, finely chopped
- 2 tbsp butter
- 2 tbsp olive oil
- ½ cup dry white wine
- ½ cup grated Parmesan cheese
- Salt & pepper to taste
For the filling:
- ½ cup mozzarella, cut into small cubes (because stringy, gooey goodness)
- Optional: ½ cup cooked peas, meat sauce (aka “ragu”), or whatever your heart desires
For the coating:
- 1 cup flour
- 2–3 eggs, beaten
- 1 ½ cups breadcrumbs (Panko or Italian-style — live your truth)
- Oil for deep frying (vegetable or canola, just not motor oil, please)
Instructions (AKA The Fun Part)
Step 1: Make the risotto (if you’re not using leftovers)
You know the drill: Sauté onion in butter + olive oil, add rice, toast it, splash in the wine, and gradually ladle in warm broth while stirring like a boss. When the rice is creamy and al dente, remove from heat and stir in Parmesan. Let it cool completely. (Pro tip: Spread it on a baking sheet to cool faster.)
FYI: This step can be done a day ahead. Cold risotto is easier to shape. Also, you’ll feel like you’ve got your life together when you open the fridge and find a tray of risotto just waiting to become magic.
Step 2: Form the balls
Scoop about 2 tablespoons of risotto into your hand, flatten it a bit, stuff it with a cube of mozzarella (and peas or ragu if using), and mold the rice around the filling to form a ball. If it falls apart, don’t panic—just smoosh it back together like you mean it.
Step 3: Coat those beauties
Roll each ball in flour, dip it in beaten egg, then coat with breadcrumbs. Make sure they’re fully covered—no bald spots.
Step 4: Fry, baby, fry
Heat oil in a deep pot or fryer to about 350°F (175°C). Fry a few balls at a time until golden brown and crispy, about 3–4 minutes. Don’t overcrowd or you’ll cool the oil down (and nobody wants soggy sadballs).
Drain on paper towels. Try not to eat them all before they hit the plate.

Common Mistakes to Avoid (We’ve All Been There)
- Filling not sealed in properly: You’ll know it when cheese oozes out into the oil like a lava explosion. Make sure your risotto hugs that cheese tight.
- Oil too cold or too hot: Too cold = greasy mess. Too hot = burnt outside, raw inside. Use a thermometer if you can. Or do the breadcrumb test (drop a crumb in and see if it sizzles).
- Not letting the risotto chill: Warm risotto is way too soft to shape. Chill out. Literally.
Variations (Because Who Doesn’t Love Options?)
- Arancini al Ragu: Classic Sicilian style — filled with meat sauce and peas.
- Arancini al Burro: Filled with ham and béchamel. Basically a fancy ham and cheese pocket.
- Spinach + Ricotta: For when you want to feel a little healthier. Just a little.
- Truffle oil drizzle: If you’re feeling bougie and want to annoy your nonna.
FAQs (Because You’re Definitely Wondering This Stuff)
Can I bake them instead of frying?
Yes, but… they won’t be quite as crispy. Bake at 400°F (200°C) for 25–30 minutes. Spritz with oil spray to fake that fried crunch.
Can I freeze them?
Totally. Freeze after breading but before frying. When ready, fry straight from frozen—just add a minute or two.
What do I serve them with?
Honestly? Nothing. They’re a full snack experience. But if you must: marinara sauce, a squeeze of lemon, or even aioli. Live your best dipping life.
Do I have to make risotto first?
Yes. Sorry. But you can make it ahead, and it’s 100% worth the effort. You can also use leftovers if you’re already a risotto ninja.
Can I use a different cheese inside?
Heck yes. Fontina, provolone, or even a sneaky cube of gorgonzola for the brave. Just make sure it melts well.
What if they fall apart in the oil?
A few things could’ve gone wrong: risotto too soft, filling not sealed well, or oil temp too low. Don’t worry. You’ll nail it next batch. Practice makes perfect (and delicious).
Final Thoughts (Or: Why You Should Make These ASAP)
Arancini are like the ultimate Italian cheat code. They’re cute, portable, cheesy, crunchy, and incredibly satisfying. Whether you’re making them for a party, a snack, or just to show off on Instagram (no judgment), they never disappoint.
They’re the kind of thing that makes people go “OMG you made these?!” — and you just casually say, “Yeah, no big deal.”